Dill in Zone 9A — Southern California
Anethum graveolens · Your Complete 2026 Planting Guide
Time to Buy Starts!
Seed starting window passed, but starts are available now.
Buy Starts Now
Head to your local nursery, Home Depot, or farmers market for transplants.
- Look for stocky plants with dark green leaves
- Avoid leggy seedlings or plants already flowering
- Check that roots aren't circling the pot (rootbound)
How to Plant Dill in Zone 9A — Southern California
Here are all your options for getting dill in the ground, from the easiest method to more advanced approaches.
Direct Sow Seeds
RecommendedEarly February through late October
around February 1
Consider succession planting every 2-3 weeks for continuous harvest.
Dill has a taproot and prefers direct sowing, but transplants work if handled carefully.
Start Seeds Indoors
RecommendedEarly to late January
around January 11
Then transplant: Early February through late March
Start seeds 4-6 weeks before transplanting outdoors.
Buy Starts
Works WellEarly February through late March
around February 8
Plant purchased starts after last frost (February 1).
Transplant Outdoors
Timing InfoEarly February through late March
around February 8
Can tolerate light frost, but wait for soil to be workable.
You have a nice window — no need to rush.
Fall Planting
Late October through late November
November 8 ideal · Direct sow for fall harvest
Plant a second crop in mid-summer for fall harvest. Dill actually prefers the cooling temperatures of fall.
Overview
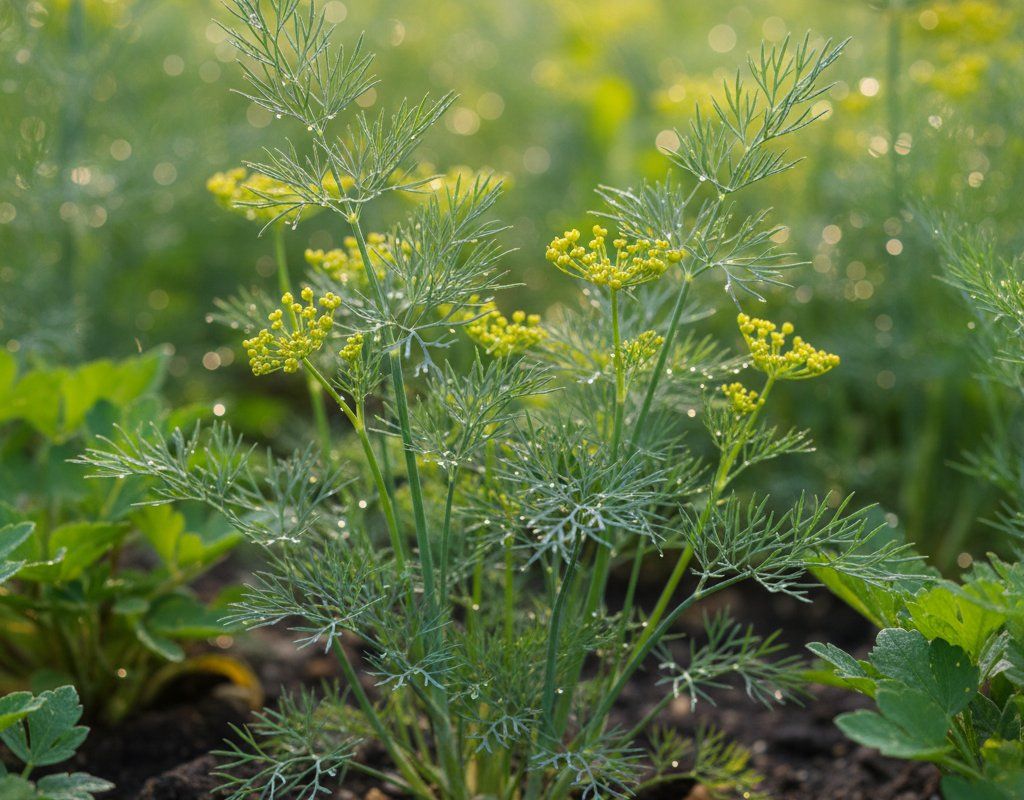
Dill brings that bright, tangy flavor that transforms everything from pickles to fish dishes, and here in Southern California, you can grow fresh dill for most of the year. Our mild winters and long growing season mean you're not limited to one short harvest window like gardeners up north. The feathery fronds add both flavor and delicate texture to your kitchen garden, while the umbrella-shaped flower heads attract beneficial insects that help your entire garden thrive.
Our hot summer heat and occasional Santa Ana winds can challenge dill, but with smart timing around our 322-day growing season, you'll have fresh herbs from early spring through late fall. The key is working with our climate patterns rather than fighting them—plant during cooler months and succession sow for continuous harvests.
Starting Seeds Indoors
Starting dill seeds indoors makes sense if you want to get a jump on the season or have better control over germination. Start seeds in early to late January, about four weeks before you plan to transplant outdoors. This timing works well with our very early spring character—by the time your seedlings are ready, the weather will be cooperating.
Use seed trays with good drainage and keep the soil consistently moist through bottom watering. Dill seeds need warmth to germinate (around 65-70°F), which shouldn't be hard to maintain indoors during our mild winters. Once germinated, provide bright light or use grow lights to prevent leggy growth.
Keep in mind that dill develops a taproot and doesn't love being transplanted, so handle seedlings gently and transplant while they're still young. Many SoCal gardeners skip indoor starting altogether since our climate allows for such a long direct-sowing window.
Transplanting Outdoors
Transplant your dill seedlings outdoors from early February through late March, once they have their first set of true leaves. This timing aligns perfectly with our last frost period in early February, giving you a comfortable buffer. Space plants 12 inches apart to allow for good air circulation—important in our sometimes humid coastal areas.
Harden off seedlings gradually over a week by placing them outside for increasing periods each day. Start with just a few hours in partial shade, then work up to full sun exposure. Our February weather can still surprise you with temperature swings, so watch the forecast and be ready to protect young plants if needed.
Handle transplants carefully since dill's taproot resents disturbance. Water them in well and consider providing temporary shade cloth if you're experiencing unusually warm weather for the season. Once established, they'll handle our typical spring conditions just fine.
Direct Sowing
Direct sowing works beautifully for dill in Southern California and is often the preferred method since dill develops that sensitive taproot. You can sow seeds from early February through late October, giving you multiple opportunities throughout our long growing season. This extended window is one of our biggest advantages over colder regions.
Prepare your soil by working in some compost and ensuring good drainage. Dill seeds are small, so scatter them lightly over the surface and barely cover with soil—they need light to germinate. Space plantings about 12 inches apart, or thin seedlings to this spacing once they emerge. Soil temperature should be at least 60°F, which is easily achievable here by mid-February.
The main advantage of direct sowing is avoiding transplant shock, plus you can succession plant every 2-3 weeks for continuous harvests. Fall plantings from late October through November often perform exceptionally well in our climate, giving you fresh dill through winter when coastal influence keeps temperatures moderate.
Watering Dill in Zone 9A (Southern California)
Dill needs moderate, consistent water to produce those tender, flavorful leaves, and managing moisture is crucial in our hot, dry climate. During our winter-wet season, natural rainfall might handle most watering needs, but you'll need to supplement as we move into spring and definitely through our hot summers. Aim for about 1 inch of water per week, adjusting based on temperature and humidity levels.
Use the finger test—stick your finger 2 inches into the soil near the base of the plant. If it's dry at that depth, it's time to water. Water at the base rather than overhead to prevent foliar diseases, though our low-to-moderate humidity makes this less critical than in more humid regions. Morning watering works best, allowing plants to take up moisture before the day heats up.
Watch for signs of stress carefully. Under-watered dill will bolt quickly in our heat, sending up flower stalks and making leaves bitter. Over-watered plants develop yellowing leaves and weak growth. The key is consistency—erratic watering combined with our temperature swings will trigger bolting faster than almost anything else.
Apply 2-3 inches of mulch around plants to retain soil moisture and keep roots cool during our intense summer heat. This is especially important for inland areas where temperatures regularly hit the mid-90s. During heat waves or Santa Ana wind events, you may need to water daily to prevent stress.
🧪Fertilizing Dill
Feeding Schedule
Organic Fertilizer Options
Harvest Time
You can start harvesting dill leaves about 40 days after planting, which puts your first harvest anywhere from mid-March through late December depending on when you planted. Look for plants that are at least 6 inches tall with several sets of feathery leaves—this usually happens quickly in our favorable growing conditions.
Harvest by snipping individual fronds or cutting stems back by one-third, always leaving some foliage for continued growth. The best flavor comes from young, tender leaves harvested in the morning after the dew has dried but before the day gets hot. Regular harvesting actually encourages more leaf production and delays flowering.
For dill seeds, let some plants flower and wait until the umbrella-shaped flower heads turn brown and dry—usually 2-3 weeks after flowering. Cut the entire head and shake seeds into a paper bag. Our dry fall weather is perfect for seed development, so fall-planted dill often gives the best seed harvest.
As we approach our first frost period in mid-December, harvest heavily or pull entire plants. You can hang whole plants upside down in a cool, dry place to finish curing seeds, or freeze fresh leaves in ice cube trays with water or olive oil for year-round use.
Common Problems in Zone 9A (Southern California)
Bolting is dill's biggest enemy in Southern California, especially during our hot summer months. You'll see the plant suddenly send up a tall flower stalk, and the leaves become bitter and lose their delicate texture. This premature flowering happens when plants experience heat stress, inconsistent watering, or long hot days that trigger reproductive mode.
Prevent bolting by planting during cooler months—early spring and fall plantings perform best. Keep soil consistently moist, especially during heat waves, and consider providing afternoon shade when temperatures climb above 85°F. Succession planting every 2-3 weeks ensures you'll have tender young plants even if some bolt early. Choose bolt-resistant varieties if you're determined to grow dill through summer.
Aphids love dill's tender new growth, appearing as clusters of tiny green, black, or white insects on stems and leaf undersides. You'll notice sticky honeydew residue and possibly curled or distorted leaves. Our warm weather allows aphid populations to explode quickly, and they're especially problematic during spring growth spurts.
Knock aphids off with a strong water spray early in the morning. Encourage beneficial insects like ladybugs and lacewings by planting nearby flowers. For heavy infestations, insecticidal soap works well and won't harm beneficial insects when used properly. Avoid over-fertilizing with nitrogen, which produces the soft, succulent growth aphids prefer.
Caterpillars, particularly parsley worms (swallowtail butterfly larvae), can defoliate dill plants surprisingly quickly. These large green caterpillars with black stripes are actually beautiful butterfly larvae, so many gardeners hand-pick them and relocate rather than kill them.
Southern California Specific Challenges: Our combination of hot summer heat, occasional Santa Ana winds, and water restrictions means timing is everything with dill. The intense inland heat can cause rapid bolting, while dry conditions stress plants into early flowering. Plan your main dill harvests for spring and fall when our mild weather provides ideal growing conditions.
Best Companions for Dill
Plant these nearby for healthier Dill and better harvests.

Keep Away From
Companion Planting Details
Dill makes an excellent companion for cabbage family crops, cucumbers, and lettuce—all of which appreciate our cooler growing seasons. Plant dill near cabbage, broccoli, or cauliflower to help repel cabbage worms and other pests. The umbrella-shaped flowers attract beneficial wasps and other predatory insects that keep pest populations in check throughout your garden.
Cucumbers and dill are classic companions, both in the garden and the kitchen. Dill's flowers attract pollinators that help cucumber production, while the plants don't compete for the same soil nutrients. Lettuce benefits from dill's pest-repelling properties, and since both prefer cooler weather in our climate, they work well in fall and spring plantings together. Avoid planting dill near carrots (it can stunt their growth) or tomatoes (they compete for similar nutrients and space), and keep it away from fennel, which can cross-pollinate and affect flavor.
🌸Best Flowers to Plant with Dill
These flowers protect your Dill from pests and attract pollinators for better harvests.
For Pest Control


Get a Reminder When It's Time to Plant
We'll email you when key planting windows open for your zone.